

Microsoft Skype for Business and Microsoft Teams Network Testing Companion

Microsoft Skype for Business and Microsoft Teams Network Testing Companion is more refined version of exiting Skype for Business Network Assessment Tool which usages the existing “Skype for Business Network Assessment Tool” with new UI.
Why I should run this?
Call quality issues are evident when Microsoft best practices not applied. As a result, users and administrators spend lots of their time to find out the root cause of poor call quality issues like Choppy, tinny, or delayed audio.

In a Skype for Business or Teams call, certified headset and network between client and server plays a big role.
High packet loss or jitter causes choppy audio and at the same time non-certified devices adds lots of trouble like background noise because device is in use not optimized for Microsoft SfB/Teams. For certified devices, do visit Sfb/Teams Devices
What should we do to resolve call quality issues?
Microsoft Network Testing tool gives us more detailed information like system readiness, SfB/Teams devices check, Network Connection Check and Media quality between client and Microsoft Skype for Business Online or Teams.
Based on finding of Network Testing Tool, you can make remediation plan and resolve such issues.
This tool requires:
- Windows 7 or later version of Operation system.
- Windows Management Framework 5.1
- User who is going to run this should have Local Admin privileges.
- Allowed execution polices. To know more, please visit About Execution Policies
There is no Office 365 or Skype for Business/Teams account required to run the tool.
How to Install Microsoft Skype for Business Online or Teams Network Testing Companion?
Click on Windows button and search PowerShell.
Right click and use “Run as Administrator” option.
Once you click on “Run as Administrator”, system might ask for UAC. Just click yes.
Windows PowerShell will open:

Now to install the network assessment tool, run the PowerShell command:
| Install-Module -Name NetworkTestingCompanion |
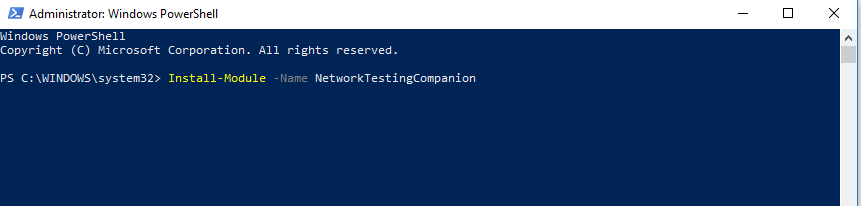
After entering the command press enter key and if system ask your inputs for this command, just press “A” which means “Yes to All”
Above given command will install the required components and on completion, PowerShell cursor will blink into next row:

To run the network assessment tool, run the powershell command given below:
| Invoke-NetworkTestingClient |
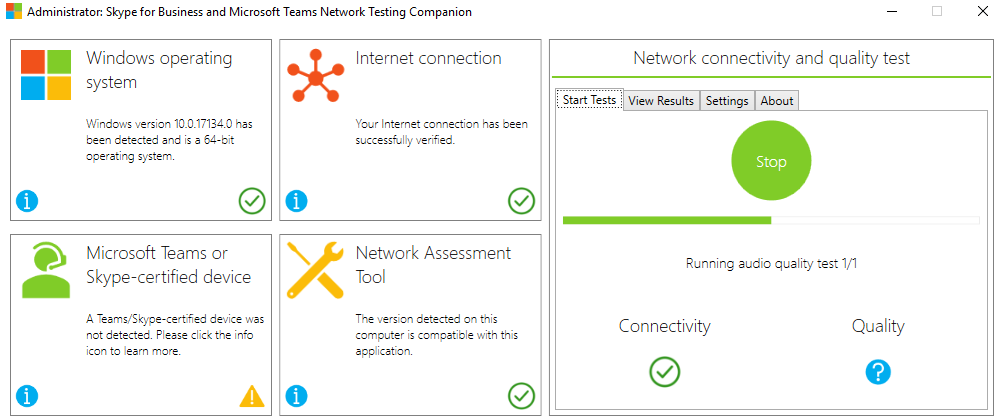
Once you enter the above given command, PowerShell will invoke the Application and you will see the UI given below is opened:

This is the main page or dashboard of 1.5.4 version, and it checks the compatibility of the Operating System, Internet Connection, Connected certified devices and Network assessment report:

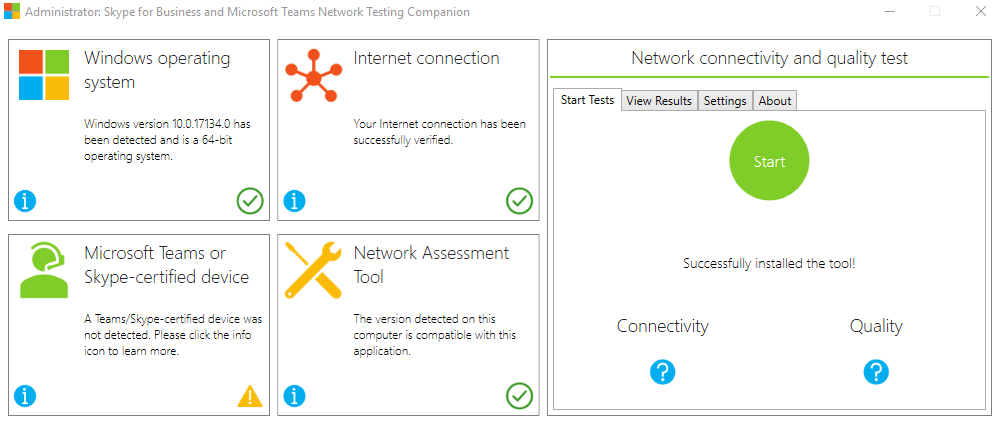
To start network testing, do click on install button:
Post completion of required components, tool will notify you and it activates the Start button:

Before starting the tool, you can change the settings.
For example, how many tests you want to perform or how much delay you want in between each test or how many seconds you want to set for timeout.
With current release which is 1.5.4 we can run:
- Consecutive audio tests= max 50
- Delay between audio test (Seconds) = max 120
- Connectivity test timeout (seconds) = max 190

After changing the required settings, lets go back to “Start Tests” tab and run the test.

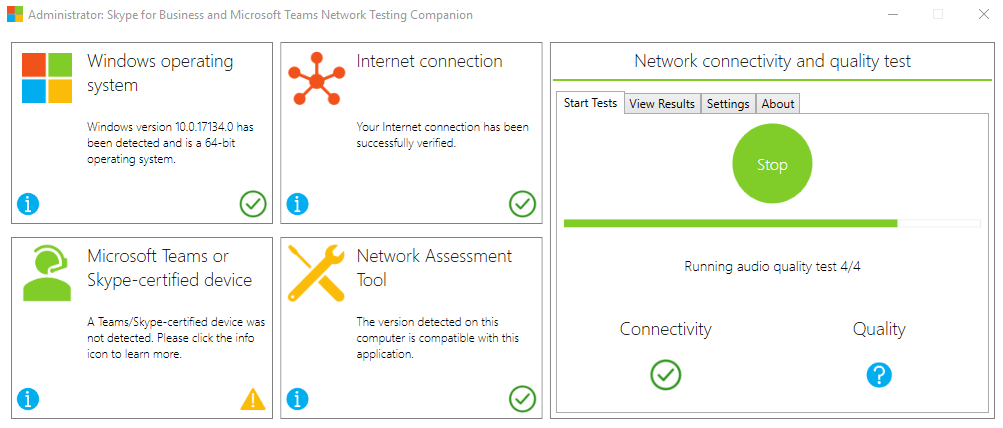
After clicking on Start, you will see that tool is running and initially it will perform the network check.

During the first section, tool will run the connectivity check for all Relay servers, and this will log into Connectivity_Results log file which is located:
C:\Users\%userprofile%\AppData\Local\Microsoft Skype for Business Network Assessment Tool .
Post completion of Network Connectivity checks, till will starting make test calls to Microsoft Skype/Teams Edge.
Pauses in between the tests:

Now tool has completed all the testing and we have result ready to read. This is nice to see that my system/local network is healthy and meeting requirements for SfB/Teams calls:

Let’s see more detailed results clicking “View Results” tab:

Poor Network | Call Quality Issue
Now let’s check the network quality using different network connection. Sometime when we are at Coffee shops or public areas where more users are using share wifi network and quality is not controlled, we do see lot of call quality issues. I am assuming that internet speed or link quality could be like 3G/2G network these days. Just to test, I have made my mobile as 3G/2G hotspot and connected my system with that. This time we have got Network Quality failed:

When looking into result, I have found that results were bad because Jitter was high:

As per Microsoft recommendations, Jitter should be <30ms
| Metric | Target |
| Latency (one way) | < 50ms |
| Latency (RTT or Round-trip Time) | < 100ms |
| Burst packet loss | <10% during any 200ms interval |
| Packet loss | <1% during any 15s interval |
| Packet inter-arrival Jitter | <30ms during any 15s interval |
| Packet reorder | <0.05% out-of-order packets |
Can I download the detailed report?
Yes, you can download the report from tool UI. To download the report, you can just click on the Report icon mentioned in the red square:

Microsoft Teams Office 365 Skype for Business Online TechcommunityTroubleshooting
Microsoft Skype for Business and Microsoft Teams Network Testing Companion
March 29, 2019 by Hariom Jindal Leave a Comment (Edit)
Reading Time: 5 minutes

Microsoft Skype for Business and Microsoft Teams Network Testing Companion is more refined version of exiting Skype for Business Network Assessment Tool which usages the existing “Skype for Business Network Assessment Tool” with new UI.
Why I should run this?
Call quality issues are evident when Microsoft best practices not applied. As a result, users and administrators spend lots of their time to find out the root cause of poor call quality issues like Choppy, tinny, or delayed audio.

In a Skype for Business or Teams call, certified headset and network between client and server plays a big role.
High packet loss or jitter causes choppy audio and at the same time non-certified devices adds lots of trouble like background noise because device is in use not optimized for Microsoft SfB/Teams. For certified devices, do visit Sfb/Teams Devices
What should we do to resolve call quality issues?
Microsoft Network Testing tool gives us more detailed information like system readiness, SfB/Teams devices check, Network Connection Check and Media quality between client and Microsoft Skype for Business Online or Teams.
Based on finding of Network Testing Tool, you can make remediation plan and resolve such issues.
This tool requires:
- Windows 7 or later version of Operation system.
- Windows Management Framework 5.1
- User who is going to run this should have Local Admin privileges.
- Allowed execution polices. To know more, please visit About Execution Policies
There is no Office 365 or Skype for Business/Teams account required to run the tool.
How to Install Microsoft Skype for Business Online or Teams Network Testing Companion?
Click on Windows button and search PowerShell.
Right click and use “Run as Administrator” option.
Once you click on “Run as Administrator”, system might ask for UAC. Just click yes.
Windows PowerShell will open:

Now to install the network assessment tool, run the PowerShell command:
| Install-Module -Name NetworkTestingCompanion |

After entering the command press enter key and if system ask your inputs for this command, just press “A” which means “Yes to All”
Above given command will install the required components and on completion, PowerShell cursor will blink into next row:

To run the network assessment tool, run the powershell command given below:
| Invoke-NetworkTestingClient |
Once you enter the above given command, PowerShell will invoke the Application and you will see the UI given below is opened:

This is the main page or dashboard of 1.5.4 version, and it checks the compatibility of the Operating System, Internet Connection, Connected certified devices and Network assessment report:

To start network testing, do click on install button:
Post completion of required components, tool will notify you and it activates the Start button:

Before starting the tool, you can change the settings.
For example, how many tests you want to perform or how much delay you want in between each test or how many seconds you want to set for timeout.
With current release which is 1.5.4 we can run:
- Consecutive audio tests= max 50
- Delay between audio test (Seconds) = max 120
- Connectivity test timeout (seconds) = max 190

After changing the required settings, lets go back to “Start Tests” tab and run the test.
After clicking on Start, you will see that tool is running and initially it will perform the network check.

During the first section, tool will run the connectivity check for all Relay servers, and this will log into Connectivity_Results log file which is located:
C:\Users\%userprofile%\AppData\Local\Microsoft Skype for Business Network Assessment Tool .

Post completion of Network Connectivity checks, till will starting make test calls to Microsoft Skype/Teams Edge.
Pauses in between the tests:
Now tool has completed all the testing and we have result ready to read. This is nice to see that my system/local network is healthy and meeting requirements for SfB/Teams calls:

Let’s see more detailed results clicking “View Results” tab:

Poor Network | Call Quality Issue
Now let’s check the network quality using different network connection. Sometime when we are at Coffee shops or public areas where more users are using share wifi network and quality is not controlled, we do see lot of call quality issues. I am assuming that internet speed or link quality could be like 3G/2G network these days. Just to test, I have made my mobile as 3G/2G hotspot and connected my system with that. This time we have got Network Quality failed:

When looking into result, I have found that results were bad because Jitter was high:
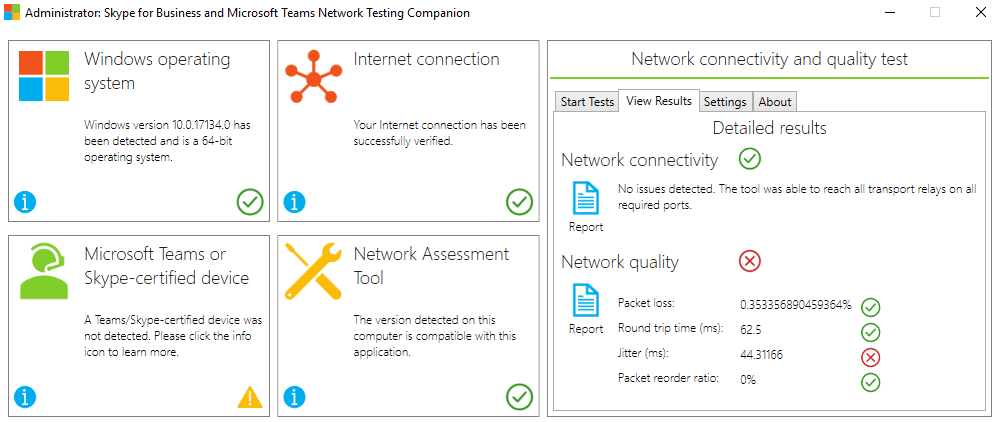
As per Microsoft recommendations, Jitter should be <30ms
| Metric | Target |
| Latency (one way) | < 50ms |
| Latency (RTT or Round-trip Time) | < 100ms |
| Burst packet loss | <10% during any 200ms interval |
| Packet loss | <1% during any 15s interval |
| Packet inter-arrival Jitter | <30ms during any 15s interval |
| Packet reorder | <0.05% out-of-order packets |
Can I download the detailed report?
Yes, you can download the report from tool UI. To download the report, you can just click on the Report icon mentioned in the red square:


